For those of you that have opted for my �7 Day SEO Boot Camp for Bloggers�, this website makeover information will seem familiar. I felt that this content was too important to pass up for those looking to put a boost in their search engine rankings. This information for the web site makeover is geared towards the WordPress-based web site.
Step 1:
To get started with the website makeover in your WordPress theme, I would recommend that you change your website�s �Permalink Setting� from your �Default� setting (or any of the other Common setting) to the �Custom Structure� with the following word /%postname%/ in the box as shown below.

You can locate this information in your WordPress Admin Dashboard under Settings > Permalinks. What this will do for you is put your title wording into the URL instead of numbers. If your existing title (the title from the first time you saved the post) to your page has keywords in them, they will now show in the URL address bar, giving you an SEO advantage.
When you make this change, your site links should continue to work, but it is always a good idea to check them to make sure.
Once you have made this change and checked to make sure your links are working correctly, it�s time to move on to the next step.
Step Two of the Website Makeover!
If you have an interest in making your website keyword-rich, giving you the greatest possibility to be indexed as an authority site, then you need to consider making changes to the URL file name of any or all pages if they don�t contain your keywords.
This will be the string of words that are beyond the last forward slash �/� of your web site address. Here�s an example of this page�s file name from the address bar above: /wordpress-website-makeover/. This filename contains only the keyword phrase used for this article.
Doing this will give you the greatest chances to land your site on the first or second page of the Search Engine Results Pages (SERPs) for certain keyword phrases pertaining to your site�s content. For this task, you will have to do what is called a �301 redirect� for each page�s URL that you decide to change.
The reason that you will need to do a 301 redirect for any pages you decide to change is: most likely you have links out there in cyberspace that lead to your existing page(s), so you will need to re-direct those old pages to the new page.
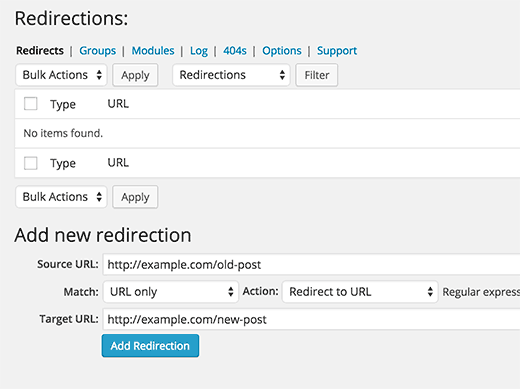
Here is the 301 Redirect Plug-in for WordPress that I would recommend:
Once you install the plug-in and activate it, you can find the 301 editor screen under Settings > 301 Redirects in the WordPress Admin Dashboard. You must be an administrator to edit your list of new redirects.
IMPORTANT: Before you make the change to a page�s file name, be sure to document the Top-Level part of the URL to place into the 301 redirect �Request� box as shown below. The top-level part of the URL is the forward-slash �/� along with the words that directly follow the domain name.
I know I�m repeating myself, but I can�t stress the importance enough� make sure you copy the top-level of the wording exactly as it appears in the address bar, including the forward-slash �/� directly after the .com, .net. or .org, etc. to put into the �Request� box� then put the new keyword-enriched complete URL into the �Destination� box as shown and click Save Changes.
The best way to do this is to copy, then paste the URL information directly from the address bar for each page you want to change, one-page modification at a time. Another great way of doing this is to have 2 browsers or 2 tabs open so you can go back and forth making the changes (1 browser or tab for the 301 redirect plug-in to add the before and after URL information, the other to do the before and after editing of the URL changes).
If you would like to learn more about the redirect, please follow the link to my article about the 301 Redirect.
Below is a photo that shows the location to do the URL changes in your Edit Post box, if you choose to take on Step 2. All you need to do is click on the �Edit� button, delete the old words, then add your main keyword or keyword phrase only, separating each word with a hyphen.
NOTE: When you do this step to create a newly keyword-enriched URL, do not add any additional words other than your keyword or keyword phrase� it will actually help your SEO efforts to leave out non-relevant words.

Here is a Plug-in to Compliment Step 2 (to remove non-relevant words)
If you plan to do this work in step 2, then consider the following WordPress plug-in called SEO Slugs, located at: http://wordpress.org/extend/plugins/seo-slugs/!
What the SEO Slugs WordPress plugin does for you is removing the common words like �a�, �the�, �in� from post slugs (in a nutshell, the URL that I am talking about in Step 2) to improve your Search Engine Optimization.
For example, when you publish a post with a title like this: �What You Can Do Immediately For Higher Rankings�, WordPress automatically assigns a long filename to your post, called a post slug: /what-you-can-do-immediately-for-higher-rankings/.
SEO Slug's plug-in strips common words like �what�, �you� or �can� out of your post slug to make it more search engine friendly. With SEO Slug's plug-in activated, the slug for our example blog post would look like this: /immediately-higher-rankings/
The slug is generated on the automatic saving of draft (so you get a chance to look at it before publishing, and change it), or on publish.
One last NOTE about this plug-in: This plug-in has been tested compatible up to WordPress: 2.1.2, yet I am using it currently with my 3.0.1 version with no problems at all. I have been using this plug-in for a while now, so I thought I�d try it out on my Test Blog to see if it would automatically change the URL on an existing article to the shorter version as described above, and it did not.
What I am saying is that you will need to change the URL manually for existing articles, as I mentioned above. After the plug-in has been installed and activated, it will shorten your URL for any new articles that you write.
You�re on a Roll� Don�t Stop: If you know that changing the URL structure in Step 2 is of great SEO importance, then you need to consider setting aside some time to optimize all of your highly important �Title tags� as I described in my article �Importance of Title Tags � SEO Tips for the Writer!� If you are not familiar with what I am speaking of, then please visit the �Title Tags�, article link above.
In my opinion, the best way to redo your title tags is to use the WordPress-based plug-in called the All in One SEO Pack. Once you have installed the All in One SEO Pack into your WordPress-based site and enabled the plug-in, you will have a section to add this information at the bottom of your �Edit Post� page as shown below.

When you re-write your title, keep in mind that it should be a concise statement summarizing the main point of your content, and should be compelling enough to encourage search-engine users to click the link and visit your site.
The Title tag standard guideline has been 65 characters because most search-engines do not display any more than that, but since you are using the All in One SEO Pack, you might as well limit your characters to no more than 60. While you are at it, take the time to fill in the Description and the Keywords section too.
Final Comments about a WordPress-Based Website Makeover!
There are many facets of Search Engine Optimization, and even though this information is just the tip of the iceberg, a keyword-enriched website is a crucial element in the comprehensive SEO approach to improving your search engine rankings.
Optimizing your site requires attention to your whole site; it does little good to optimize portions of your site and leave other areas lacking the same attention to detail. If you feel that your site is in need of optimizing, do it right and make sure you hit all of the elements as you go.
If You Found This Article About Website Makeovers Helpful, Then Please Share This Post with Your Friends by Clicking on the Facebook, Twitter and Other Share Buttons, Thank You!


